Sunday, September 9, 2012

Battle Ready Night Goblins

Here's a quick picture of the first batch of Night Goblin spearmen that I've finished painting. They're "battle ready".  Not gonna win a Golden Demon award, but good enough for the tabletop.

Zoom in for details...
Still need to actually base the models; I just slapped a coat of green paint for the picture.

A few things are left unfinished that I can complete later:
1) teeth and eyes
2) another layer of highlighting
3) general cleanup

Wednesday, August 29, 2012

The Rematch

NOTE: This battle report was complete, and then Blogger lost all my saved changes. So...
I'm only posting what little text it still has, along with the pictures we took. 
I'm too disgusted to recreate all that work.

F U, Blogger (and F U, Google, by proxy)


We decided to refight the battle between the Dwarfs and Night Goblins, beefing up both armies slightly. We also had a friend that was interested in learning Warhammer Fantasy Battle so he came over and took the helm of the greenskin army. My cousin commanded the Dwarfs once again.

Reminder - we're using 6th edition Warhammer Fantasy Battle rules.

The Armies

Dwarf Army List:
Dwarf Lord as General w/ heavy armor and shield - 66pts
20 Dwarf Warriors w/ light armor and shield, champion, standard, musician - 190pts
20 Dwarf Warriors w/ light armor and shield, champion, standard, musician - 190pts
19 Crossbowmen w/ light armor and shield, champion, standard, musician - 190pts
10 Thunderers - 120pts
Cannon - 100pts
Cannon - 100pts
Gyrocopter - 100pts
Total: about 964pts

Night Goblin Army List:
Night Goblin Big Boss as General w/light armor, Rending Axe Magic item - 67pts
20 NG Spearmen w/ shields, champion, standard, musician - 90pts
20 NG Archers w/ champion, standard, musician - 90pts
Level 2 Night Goblin Shaman - 85pts
10 Spider Riders w/ spears, shield, champion, standard, musician - 180pts
Troll - 50pts, lead by Big Boss w/ Biting Blade magic item, additional hand weapon - 44pts
16 Orc Boys w/Choppas and extra hand weapon - 97pts
16 Orc Arrer Boys w/bows - 112pts
3 Night Goblin Fanatics - 75pts

Terrain on the battlefield was set up the same as the previous Night Goblin / Dwarf battle.  After deployment, it was clear that this would be a very different battle than the first engagement.


View of the oncoming Goblin horde...


After Turn 1.  Dwarf Red cannon on right flank misfired, blue cannon on left flank overshot target.

Turn 2, the gyrocopter opened fire.

 Then the night goblins turned to engage in combat. Gyro passed the break check.
Animosity crippled the movement of the gobbos, leaving the spider riders squabbling on the extreme left flank.


Turn 3, the dwarf blue cannon got a great shot, hitting a bunch of night goblins spearmen.


Next round of combat saw the gyrocopter fleeing!
 Spider riders overcame their animosity and moved up the flank.
 Overhead shot after turn 3.
 Turn 4, Orc boys line up for a charge into the Thunderers.
Thunderers couldn't withstand the charge and were broken from combat.  This was a critical moment in the battle.  Up until now, Goblins had been really affected by animosity.
End of Turn 4: The sight of the Thunderers broken from combat caused the two main Dwarf warrior units, one led by their general, to panic and flee.  The Dwarfs almost lost the battle here and only the short legs of the Dwarfs prevented them from running off the table.
Turn 5: Dwarf cannons and Crossbows finally had some shots hit home and caused casualties across the Dwarf line but nothing major.  Also, magic up until now had been ineffective.
As you can see in the two shots below, the dwarf units rallied.  Barely.
 Overhead shot after Turn 5: You can see that the Troll has slowly moved up the center after lots of failed Stupidity tests, the Orc Boys are the only unit to make it into the Dwarf line, and the rest of the goblin units have been affected by animosity. The center goblin archer unit has suffered artillery casualties.
 The Night Goblin spearmen unit with their Big Boss general broke the gyrocopter in combat again.  The gyro fled into the forest and crashed into the trees, getting destroyed.
In the round of combat with the Orcs, the Thunderers caused two wounds and both were saved by armor if a 6 was rolled. Both sixes!
 Turn 6:
Dwarfs charged the Troll.
 Dwarfs defeated the Troll in combat and he broke, running away (much to the chagrin of his goblin big boss minder).
 The spider riders finally overcame their animosity and charged the dwarf red cannon on the dwarf right flank. They lost and the spiders over-ran them in pursuit but went a little too far off the board.
 At the end of turn 6, the Night Goblins had 3 table quarters, victory points from the cannon and gyrocopter, giving them the big win over the Dwarfs!

Still annoyed that I lost the entire writeup about this battle.

Lost Progress

Well, I spent a number of hours working on a battle report.
Logged into Blogger today and all that work is missing. Don't know what happened, but it's all gone.
I have a feeling this battle report won't be including text. Just pics.

Ugh.

Saturday, August 18, 2012

Progress

Finally making progress on painting up these Night Goblins. It's slow, but steady.
There is still another level of highlighting to be added, and some detail work (like the metallic bits), then the infamous "dip" method.
80% complete.
There is work left to do, but I will probably start getting base colors on the next group of 10 spearmen.

Tuesday, August 14, 2012

Friday Night Fights

My cousin returned for a weekend of wargaming. We started with a 40k battle of old foes: my Imperial Guard vs his Blood Angels. 1200 Point battle.

The Blood Angles Army List
Command HQ: Dante 225pts
Troops: 5 Sanguinary Guard with company banner, power fist, Infernus melta pistol 250pts
Elites: Chaplain 125pts
Troops: 5 Death Company w/ jump packs, thunder hammer, hand flamer, 215pts
Troops: 5 Assault Squad w/ sergeant with plasma pistol, flamer, melta bombs 125pts
Fast Attack: Ba'al Predator 150pts
Heavy Support: Whirlwind tank 90pts
Total: 1195

For the Imperial Guard army list, I'm just going to list basic information otherwise I'll be typing for a few pages...
The Imperial Guard Cadian Army List
Command HQ: Command Company HQ 100pts. Lt. with Power Weapon, Vox, Regimental Standard, Veteran Lascannon team.
Mounted in Chimera with heavy flamer, dozer blade, hull mounted flamer, pintle mounted Storm Bolter 75pts
Elites: 7 Ratling Snipers 70pts
Troops: Infantry Platoon
-Platoon Command Squad with power fist, 2 meltas, lascannon team 85pts
-Squad Abel 10 guardsmen w/grenade launcher, vox, missile launcher team 75pts
-Squad Bravo 10 guardsmen w/grenade launcher, vox, missile launcher team 75pts
-Squad Charlie 10 guardsmen w/flamer, vox, missile launcher team 75pts
-Squad Delta 10 guardsmen w/flamer, vox, autocannon team 70pts
-Squad Echo 10 guardsmen w/lascannon team 70pts
-Special Weapons Squad 6 guardsmen w/3 plasma guns 80pts
Heavy Support: Leman Russ with hull mounted lascannon 165pts
Heavy Support: Leman Russ with hull mounted lascannon, side sponson heavy bolters 185pts
Total: 1125

We played the "Big Guns Never Tire" mission. Heavy Support teams were the scoring units, diagonal deployment zone. 4 objectives on the battlefield, 3 VPs each. 1 VP for first player to destroy an enemy unit, and 1 VP for each heavy support destroyed, "Linebreaker" victory condition: 1 VP if scoring unit in enemy deployment zone.

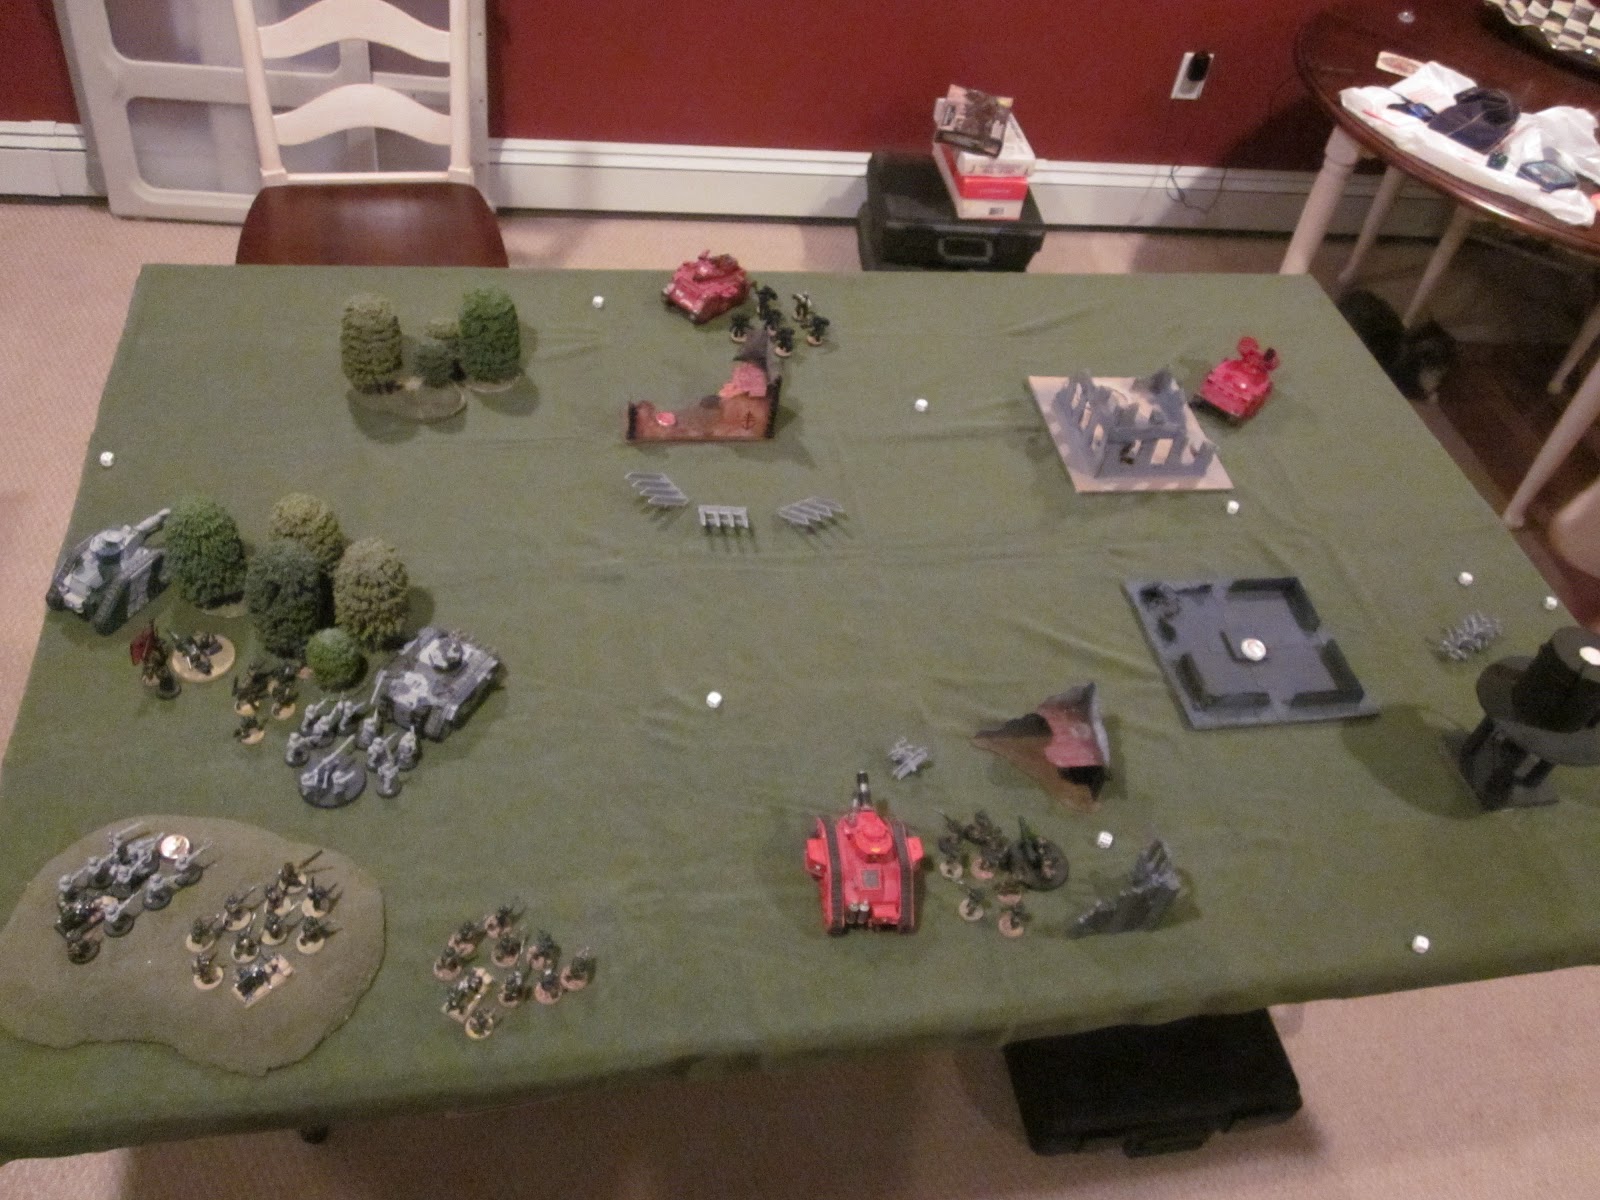
Here's a shot of the terrain setup and the deployment zone, with objective markers noted. Objectives are numbered clockwise beginning from bottom left, 1 (on the hill), 2 (in the woods), 3 (in center ruins), 4 (in far right ruins).
Here's a couple shots after we deployed.

As you can see above, the Blood Angles only deployed the Predator, Whirlwind, and Death Company. The rest were held in reserves (with their very accurate deep strike ability). 

After all the units had deployed, the Ratlings infiltrated into the woods on the IG left flank to claim the objective.

Imperial Guard won the initiative and deferred giving the Blood Angles the first turn.

Turn 1 Blood Angels:
Ba'al Predator got a scout move, moved up the flank towards the objective that the Ratlings were holding.
Final moments...
Death Company followed in support. Then the Predator fired the Flamestorm Cannon, unleashing ridiculous amounts of heavy flame into the woods and burning 5 of the 7 Ratlines to a crisp. The remaining 2 Ratlings promptly failed their panic check and ran off the board. My cousin summed it up perfectly: "So that's that."
"So that's that."
The Whirlwind on the far right corner launched a barrage that hit the Chimera, but the shots pinged harmlessly off the armor.

Turn 1 Imperial Guard:
The Imperial Guard began executing their battle plan, ignoring the objective on their right flank and concentrating on the 3 objectives on the left flank of the board.  With the platoon squad mounted inside, the chimera surged forward towards the tank traps, Death Company, and Objective 3.  Infantry Squad Delta followed the Chimera's lead, moving around the right side of the Ratling wood and Objective 2 with the Specialist squad full of plasma guns right behind them.
The Leman Russ without the sponsons moved up the left flank around the woods to deal with the advancing Predator, with the Company Command Squad following behind.
Your days are numbered...

It was time for the Big Guns to open fire. First the lascannon in Squad Echo drew a bead on the Predator which happened to present it's side armor. The beam of light sliced right through the weak armor and hit the fuel tanks blowing the Predator to pieces. Having lost it's main target, the Leman Russ next to Squad Echo turn it's Battle Cannon on the Whirlwind, shaking the crew for a turn.  The missile launcher team in Squad Charlie found the Death Company Chaplain as their only target and hit him directly, but a last minute Look Out Sir saved his bacon.  It was a tough turn for the Blood Angels; a foreshadowing of things to come.

Turn 2 Blood Angels:
The orbital link between the Chaplain and the Reserves was blocked by interference and the Reserves did not appear this turn. The Chaplain lead the Death Company in a charge against the Chimera. It didn't take long for the Death Company to rip open the Chimera and cause it to blow up. The Platoon Command Squad inside the Chimera tried to escape and only the two meltaguns and the Commissar managed to survive.

The Whirlwind crew managed to clear the cobwebs from the Battle Cannon shot the previous turn, but missed their target.

Turn 2 Imperial Guard:
The Leman Russ on the left flank moved around the woods to get into position for the Death Company.
The Special Weapons Squad ran forward with their plasma guns to save the Commissar. With a brief hum, the supercharged plasma guns flashed and hit the Death Company, killing all of them including the Chaplain.
I swear there were Space Marines a second ago...

Battlefield after Turn 2
Turn 3 Blood Angels:
The comm-link was re-established and the units in reserve arrived this turn. The Assault Marines landed on the other side of the ruins near Squad Echo on the IG right flank, while Dante and the Sanguinary Guard appeared directly behind the Leman Russ near the Ratling Woods and Objective 2.
Assault Marines preparing to hit the Imperial Guard flank

Dante and his Sanguinary Guard about to wreak havoc
The Whirlwind takes another shot on Squad Delta and killed one guardsman.
Dante, the master of taking out vehicles, hit the unprotected rear of the Leman Russ with his Infernus meltapistol, the explosion flinging super-heated shards of metal everywhere.


Turn 3 Imperial Guard:
The Imperial Guard Company Commanding Officer realized that his time on this ugly rock was probably numbered and issued orders to Squad Delta destroy the Whirlwind and "Bring it Down!".  The Autocannon team in Squad Delta heard the orders loud and clear, knowing that they needed to eliminate any heavy support that the Marines had.  The autocannon ripped into the Whirlwind and destroyed it. Squad Echo held their nerve just long enough to take a shot with the lascannon and killed one of the newly arrived Assault Marines.


Up on the hill with Objective 1, the missile spotter realized he had a great shot on Commander Dante. With a tap on the triggerman's head, the missile screamed across the battlefield and scored a direct hit on Dante. His ward save and another "Look Out Sir!" was not enough to handle the power of the missile, killing him instantly.  With a roar of triumph, the Special Weapons team knew they had a chance to end the fight right here. They advanced towards the remaining Sanguinary Guard (normally a suicide mission) and let loose 9 shots of super-heated plasma gas.  Confused by the death of their leader, the Sanguinary Guard were not expecting to get hit by that much plasma. 4 of them died, with the battle standard bearer the only one remaining.


The remaining Sanguinary Guard knew the fight was lost and radioed the Assault Marines moments before they were going to charge. The order to retreat was given and the Blood Angels conceded the fight to the Imperial Guard.
Imperial Guard victory!
A stunning, unexpected victory for IG!


Sunday, July 22, 2012

Return to Fantasy: Part 2

In our last episode, the Spider Riders tried to hit the flank of the Dwarfs, but the Dwarfs repelled them and almost broke the Night Goblin Army.  
Turn 3: Night Goblins
The Gobbos started with fleeing spider riders causing panic checks down the line.  Thankfully, the spearmen hold.  The spiders fail to rally, however, and continue to flee to the nearest edge. It appears that the rest of the Night Goblin army is going to cooperate this turn as no units are affected by Animosity and the Troll even manages to pass his stupidity check against leadership 4!  He remembers what he was doing and moves the full 6 inches towards the dwarf crossbowmen holding the hill. In a flash of intelligence, the Troll even decides to take cover behind the wall.  The rest of the night goblins take a cue from the Troll and move forward, preparing to slam into the dwarf line.
Hold...
The goblin shaman successfully draws enough power to cast the spell, but the Dwarfs dispel it.  Forgot to mention that the same thing happened on Turn 2...
Turn 3: Dwarfs
Seeing that the real combat is about to begin, the Dwarfs take one last chance to unleash the cannon.  Unfortunately the crew got a little anxious and lit the fuse to early. The cannon misfired again and could not shoot for two turns. The crossbowmen show them how it's done and manage to wound the Troll once.

Turn 4: Night Goblins
Before anything starts, the spider riders again fail their rally check and flee off the battlefield giving the first victory points to the Dwarfs.  After the remaining units pass their animosity checks the Night Goblin Big Boss issues charge orders to both spearmen units and they crash into the main Dwarf Warrior unit, with the secondary spearmen hitting the flank.
...the Dwarfs hold...

Before combat begins, the Night Goblin shaman tries in vain to cast the spell, and the Dwarfs dispel it.
The Night Goblins cause some decent damage, but it's the weight of numbers (rank bonuses, and the flank attack eliminated the Dwarf rank bonus) that tips the combat's favor in the Night Goblins' favor.  They win combat by a very large margin, causing a break check that could win the game, but the leadership of the Dwarf Hero General is barely enough to hold.  This is would be the pivotal combat result of the game.  The Night Goblins wrap around to envelop the Dwarfs, bringing more warriors to the fight.

Turn 4: Dwarfs
With a roar, the second Dwarf Warrior unit charges into the rear of the Night Goblins that were on the flank.  As they were already engaged in combat getting charged in the rear is an incredibly disheartening event.  Amazingly the spearmen pass their Panic check and fight on, but lose their rank bonus. We have a big melee now. Overall, the Dwarfs cause more total wounds than the Night Goblins and also have significant rank bonus with the new unit that charged in. This tips the combat in their favor.  Both goblin units fail their break checks, and as the main goblin unit with the general turns tail and flees, the Dwarfs pursue after them and run them down, cutting and hacking them to pieces as they retreat.
...and the Goblins do not!

At this point, I concede the battle to the Dwarfs.  A well fought game.
Victory for the Dwarfs.

The Return to Fantasy: Part 1

Finally made my return to Warhammer Fantasy Battle. I'm hoping to introduce a friend of mind to the game soon and wanted to brush up the rules (read: re-learn them completely).  I remembered that I bought a Battle for Skull Pass boxed set a while back at half-price. It included an entire starter Night Goblin army, and I also found some other Night Goblins in a box somewhere along with 16 Orc Boys and 16 Orc Boys with bows. I figured that was enough to use as an extra army so we can get a few battles in. All I have to do is paint 'em up and I have an extra army lying around.

I called my cousin and he came over to be the opponent. We decided he would play the Dwarfs (since I've always been Dwarfs; needed a change of pace). Roughy 750pts of Night Goblins vs around 810 pts of Dwarfs.
Basic Order of Battle is listed below.
Dwarfs:
20 Warriors w/ light armor and shield; musician, standard, champion
10 Thunderers
10 Crossbowmen
Dwarf Hero General (Thane)
Dwarf Cannon

Night Goblins:
Night Goblin Big Boss General w/ Rending Axe magic item
Level 2 Shaman
20 Night Goblin Spearmen
20 Night Goblin Archers
10 Forest Goblin Spider Riders
1 Troll

Note: we played with 6th edition rules.

Dwarfs won the initiative and chose to go second.
This overhead shot shows the initial deployment. Dwarfs are all painted. Night Goblins are in plastic, not painted yet.
Troll is on the far left, then Archers, then Shaman alone, then Night Goblin spearmen with General, then NG spearmen, then Spider Riders on far right. Across the way on my left are the Dwarf Crossbowmen on the hill with the tower, then Warriors with General, then Warriors, then Thunderers in fron of right hill, then cannon on the right hill.

Here's a blurry closeup of the Dwarfs.
Here's the viewpoint from the Dwarf Line.

Turn 1: Night Goblins.
Archers failed their Animosity test and shot at the spearmen to their right. No damage. Troll failed the stupidity test and ambled forward at half speed (an omen of things to come). 
Spider Riders marched forward at a gallop (do spiders gallop?) on the right flank right over the hedgerow, intent on hitting the Thunderers holding the Dwarf left flank and potentially rolling the flank. Goblin spearmen moved forward in support. The Shaman tried and failed to cast the 'Eadbutt spell.  It wasn't until the end of the battle that I realized I paid for a Level 2 Shaman, but was using him as a Level 1 the entire time. Oops.
Turn 1: Dwarfs.
No Dwarf units moved. Cannon tried to fire, but misfired. Lost shot for this turn only. Crossbowmen on the hill on Dwarf right flank (with the tower) tried to shoot at the goblin spearmen, but were out of range.

Turn 2: Night Goblins.
The Big Boss general yelled some words of...encouragement...to his unruly mob and animosity had no affect on anyone this turn.  The Troll, however, couldn't hear anything and became stupid again, moving forward slowly without any apparent destination. The Spider Riders charged the Thunderers who bravely followed their Stand and Shoot orders causing a few casualties before the spiders even got there. The other spearmen units moved forward to support the flank charge, and the archers finally got going towards the Dwarf line.
Charge!
The casualties from the stand and shoot took a little bit of steam out of the spider rider charge, and they failed to cause any wounds.  The Thunderers took heart and struck down additional foes, repelling the charge, breaking the spider riders.  The Night Goblin general was admittedly stunned; his initial battle plan has been foiled.  
Flee!
With relief, the Night Goblin spearmen watching the spiders flee into them steeled their resolve and passed their Panic check. The battle could have been lost right there.
Turn 2: Dwarfs.
Content to let the greenskin horde come to them, the Dwarfs did not move.  The cannon crew noticed that the fleeing spiders were lined up perfectly in front of the block of spearmen offering a juicy target.  
Lining up the target
With a loud crack, the cannon launched a shot directly on target, hitting the first rank of the fleeing spiders, then bounced right through the spider second rank, continue to rip through all four ranks of spearmen behind them.  Tons of casualties to both units.  Seeing the success of the cannon brethren, the Dwarf crossbows unloosed a volley of bolts into the closest spearmen unit, killing a few.

...coming up: Part 2 and the conclusion to the battle!